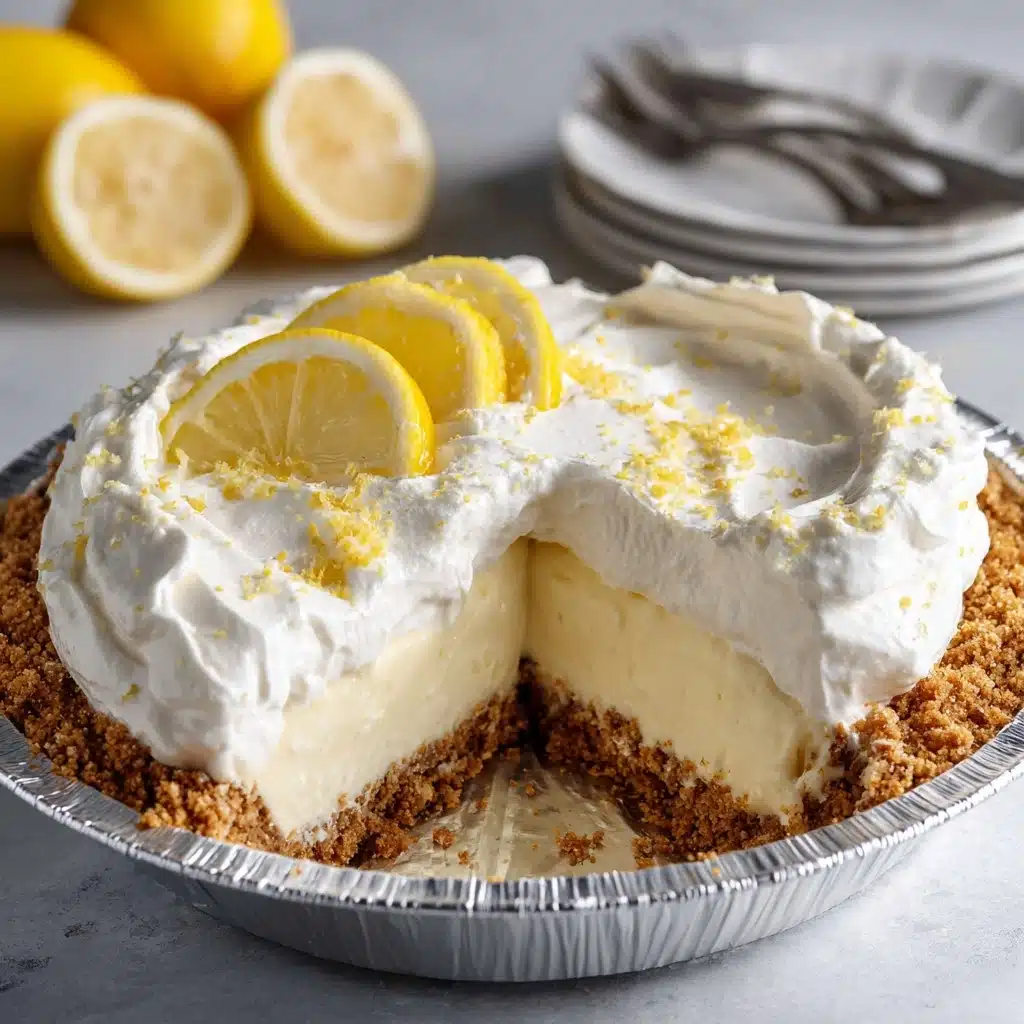
If you’re chasing the bright, unbeatable combination of tart and creamy without ever turning on the oven, you will absolutely fall in love with this No Bake Lemon Pie. It brings together tangy lemon, a dreamy smooth filling, and a crunchy graham cracker crust in a dessert that’s perfect for everything from summer BBQs to casual weeknight treats. The best part? It’s delightfully simple and quick to throw together, yet makes everyone at the table rave about “that lemon pie!”
Ingredients You’ll Need
Ingredients You’ll Need
You only need a handful of familiar, pantry-friendly ingredients to make No Bake Lemon Pie shine. Each component plays a big role—the graham cracker base for crunch, a lemony filling for tang, and clouds of whipped cream for the ultimate finish.
- Graham cracker crumbs: This gives your pie that buttery, nostalgic crust with the perfect amount of texture.
- Granulated sugar: A bit of sweetness in the crust balances the bright lemon notes in the filling.
- Unsalted butter (melted): Helps bind your graham cracker crust and gives it a rich, delicious flavor.
- Cream cheese (room temperature): The magic behind that luxuriously creamy, tangy filling—be sure it’s soft for smooth blending.
- Instant lemon pudding mix: Packs tons of lemon flavor and helps your filling set up perfectly without baking.
- Whole milk: Provides the perfect richness and texture to the lemon cheesecake filling.
- Lemon zest: Adds extra citrus aroma and flavor for a refreshing, zippy finish.
- Heavy cream (cold): Whips up into a billowy, luscious topping that completes every bite.
- Powdered sugar: Lightly sweetens your whipped cream without any grittiness.
- Vanilla extract: Just a splash adds lovely depth to your whipped topping.
- Lemon zest and slices, raspberries, and mint: Garnishes that make your pie look as stunning as it tastes.
How to Make No Bake Lemon Pie
Step 1: Prepare the Graham Cracker Crust
Begin by spraying your favorite 8-to-9.5-inch pie pan with a bit of nonstick cooking spray. In a small bowl, combine the graham cracker crumbs, sugar, and melted butter. Mix until all the crumbs are evenly moistened (it should feel like damp sand). Press this mixture firmly into your pie pan, making sure to go up the sides a bit for a classic look. Use the bottom of a measuring cup to really pack it in—this helps the crust hold together when sliced. Pop the crust into the fridge for at least 30 minutes, giving it time to set up nicely before you add the filling.
Step 2: Make the Lemon Cheesecake Filling
In a medium-sized bowl, beat the room-temperature cream cheese until perfectly smooth and lump-free. Next, add the instant lemon pudding mix and beat again until the mixture looks creamy and well blended. Pour in the cold milk little by little, mixing between additions, and allowing the mixture to thicken slightly between beats. Taking short mixing breaks (two or three times) really helps the pudding set up beautifully—trust me, this little trick makes a big difference! Beat in the lemon zest for that fresh pop of citrus, then spread the creamy mixture into your chilled pie crust. Cover and refrigerate the pie for at least 3 hours so it has time to set and become sliceably firm.
Step 3: Whip Up the Creamy Topping
While the pie chills, whip up your topping. Start with a large, cold bowl (popping it in the freezer for 10 minutes works wonders). Pour in the heavy cold cream and whip until soft peaks begin to form. Add the powdered sugar and vanilla extract, then continue whipping until you’ve got fluffy, stiff peaks that hold their shape. Once your pie is fully set, generously layer the whipped cream on top, swirling as much as you like for a bit of drama.
Step 4: Garnish and Serve
Just before serving, add another sprinkle of lemon zest on top, and if you want that extra wow-factor, garnish with fresh lemon slices, a few raspberries, and mint leaves. Not only does it look stunning, but each element adds a pop of color and a burst of fresh flavor that complements the creamy lemon filling.
How to Serve No Bake Lemon Pie
Garnishes
Take your No Bake Lemon Pie over the top with simple but impactful garnishes. Scatter extra lemon zest across the cloudlike whipped cream, add a ring of vibrant raspberries, tuck in thinly sliced lemons, and finish with a few fresh mint sprigs. They don’t just look pretty—they add layers of aroma and a touch of tang that perfectly highlights each icy-cool forkful.
Side Dishes
Pair this cool, creamy dessert with light summer favorites—think fresh berries, a simple fruit salad, or chilled iced tea. If you’re making this No Bake Lemon Pie for a special occasion, a platter of shortbread cookies or delicate madeleines alongside it makes the entire dessert course feel instantly more elegant and complete.
Creative Ways to Present
No Bake Lemon Pie is just as impressive in mini form as it is in a classic slice! Spoon the filling and crust into small mason jars or pretty glasses for individual parfaits, perfect for picnics or parties. For a brunch buffet, cut the pie into delicate bars and arrange them on a tiered tray, topped with a little whipped cream and a single raspberry for each piece. The sunny yellow color is impossible to resist, no matter how you serve it!
Make Ahead and Storage
Storing Leftovers
Just cover the leftovers loosely with plastic wrap or foil, and store your No Bake Lemon Pie in the fridge for up to 3 days. The crust stays crunchy and the filling holds its shape beautifully, making it a fantastic make-ahead treat.
Freezing
Want to make this pie even further in advance? You can freeze No Bake Lemon Pie (just skip the whipped cream topping until after thawing). Wrap tightly in plastic and a layer of foil; it will keep well for 1-2 months. Simply thaw overnight in the refrigerator before topping and serving. It’s a game-changer for stress-free entertaining!
Reheating
No reheating needed! In fact, No Bake Lemon Pie is meant to be enjoyed cold—and honestly, it’s best right from the fridge or even slightly chilled from the freezer on a hot day. If any portions become too firm, let them sit at room temperature for 10-15 minutes for the perfect creamy bite.
FAQs
Can I use a store-bought graham cracker crust?
Absolutely! If you’re in a hurry or just prefer convenience, a ready-made graham cracker crust works beautifully for No Bake Lemon Pie. Just fill, chill, and you’re set.
Is freshly whipped cream necessary, or can I use frozen topping?
You can definitely swap in thawed frozen whipped topping if you’d like. While homemade whipped cream will give you the richest flavor and fluffiest texture, frozen topping is totally fine for a speedy finish.
How do I prevent lumps in my lemon filling?
The key is to let your cream cheese soften fully before beating, then mix well with the pudding mix and milk. Don’t forget to beat it in increments, letting the pudding set between mixings—this keeps things super smooth.
What if I only have 2% or skim milk?
Whole milk is best for maximum creaminess, but 2% or skim will still set the pudding. The texture may be slightly lighter, but the pie will still be delicious!
Can I make No Bake Lemon Pie ahead of time?
Yes, and that’s one of the joys of this recipe! It keeps perfectly in the fridge for a couple of days, so go ahead and make it the night before your gathering for a stress-free, show-stopping dessert.
Final Thoughts
There’s something truly special about a dessert that brings both ease and wow-factor to the table, and No Bake Lemon Pie hits the mark every time. If you love bright flavors, creamy textures, and effortless prep, this pie is calling your name. Don’t wait for the next heat wave—gather your ingredients and get ready to delight everyone at your table tonight!
PrintNo Bake Lemon Pie Recipe
This easy No Bake Lemon Pie is perfect for hot summer days! Loaded with tart lemon flavor, the creamy lemon filling goes perfectly with the graham cracker crust and fresh whipped cream topping. Delicious!
- Prep Time: 10 minutes
- Total Time: 3 hours 40 minutes
- Yield: 10 servings
- Category: Dessert
- Method: No-Bake
- Cuisine: American
- Diet: Vegetarian
Ingredients
Graham Cracker Crust
- 1 1/2 cups graham cracker crumbs
- 1/3 cup granulated sugar
- 6 tablespoons unsalted butter, melted
Lemon Cheesecake Filling
- 8 oz cream cheese, room temperature
- 3.5 oz instant lemon pudding mix
- 1 ½ cups whole milk
- 1 tablespoon lemon zest
Whipped Cream Topping
- 1 cup heavy cream, cold
- 2 tablespoons powdered sugar
- 1 teaspoon vanilla extract
- 1 tablespoon lemon zest
- lemon zest and slices, raspberries, and mint to garnish pie
Instructions
- Graham Cracker Crust – Lightly spray a 8″ – 9.5″ pie pan with cooking spray. Mix graham cracker crumbs, sugar, and butter in a small bowl. Press the crumb mixture into the prepared pie pan. Chill pie crust for at least 30 minutes before filling.
- Lemon Cheesecake Filling – In a medium bowl, beat cream cheese until smooth. Add pudding mix and beat well until creamy and combined. Add cold milk, beating in increments until creamy, thick, and smooth. Beat in lemon zest. Pour mixture into prepared pie shell. Chill for at least 3 hours.
- Whipped Cream Topping – In a large cold bowl, whip heavy whipping cream until soft peaks form. Add in sugar and extract and continue whipping until stiff peaks form. Spread whipped cream on top of chilled pie. Top with additional lemon zest. Garnish with lemons, mint, and raspberries before serving, if desired.
Notes
- I found that in order to ensure that the pudding set up properly, I beat it in increments. I added the milk all at once, beat it, and let it sit for 1-2 minutes to let it thicken up, before I beat it again. I did this 2-3 times. This is an optional step, but it helps ensure the pudding sets properly.
- When beating your filling, it is better to over mix it than under mix it so that the pudding dissolves completely.
- If your cream cheese isn’t softened enough, you might end up with a lumpy filling, which still tastes delicious, but doesn’t look good.
- A store-bought graham cracker crust can be used instead (as I did in the video) if you prefer.
- The graham cracker crust can be baked if you prefer. Preheat oven to 375F. Bake for 7 minutes.
- Instead of using freshly whipped cream, you can also use frozen whipped topping – just thaw first!
- *Recipe updated 3/12/21.
Nutrition
- Serving Size: 1 slice
- Calories: 374 kcal
- Sugar: 14g
- Sodium: 237mg
- Fat: 26g
- Saturated Fat: 15g
- Carbohydrates: 31g
- Fiber: 1g
- Protein: 4g
- Cholesterol: 81mg


