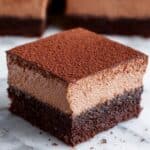
If you’ve ever dreamed of a dessert that perfectly balances rich chocolate flavor with a light, airy texture, then this Decadent Chocolate Mousse Cake Recipe is your new best friend. Combining a tender, moist chocolate cake base with a luxurious, velvety mousse topping, it’s a show-stopper that’s surprisingly easy to make. Whether it’s a special occasion or just a treat-yourself day, this cake delivers pure happiness in every bite.
Ingredients You’ll Need

These simple but essential ingredients come together to create a cake that is moist, chocolaty, and creamy. Each ingredient plays a crucial role, from the cocoa powder that adds depth to the tender flour-based cake, to the rich bittersweet chocolate that makes the mousse irresistible.
- All-purpose flour (⅔ cup / 95g): Provides the cake’s delicate structure while keeping it soft and tender.
- Cocoa powder (⅓ cup / 28g): Adds a bold chocolate flavor and deep color to the cake layer.
- Baking powder (½ tsp): Helps the cake rise just enough for a light crumb.
- Baking soda (¼ tsp): Works alongside the baking powder to create a perfect cake texture.
- Granulated sugar (¾ cup / 150g): Sweetens the cake layer for just the right balance to the rich chocolate.
- Salt (¼ tsp): Enhances and rounds out all the chocolate and sweet flavors.
- Sunflower oil (¼ cup / 60ml): Keeps the cake moist while allowing it to stay light.
- Egg (1 large, lightly beaten): Binds the ingredients and adds richness.
- Full fat sour cream (¼ cup / 60ml): Adds subtle tang and extra tenderness to the cake crumb.
- Warm milk (⅓ cup / 80ml): Moistens the batter, ensuring a smooth texture.
- Pure vanilla extract (1 tsp / 5ml): Brings out complex flavor layers in both cake and mousse.
- Bittersweet chocolate (5 oz / 142g, 70% cocoa): Forms the rich, intense base of the mousse topping.
- Milk chocolate (2 oz / 56g): Adds creaminess and sweetness to the mousse.
- Whole milk (⅔ cup / 150ml): Heated to create the luscious chocolate custard for the mousse.
- Egg yolks (3 large): Give the mousse a silky, custard-like richness.
- Granulated sugar (⅓ cup / 65g): Sweetens the custard and balances the chocolaty bitterness.
- Pinch of salt: Just enough to make the chocolate flavors pop.
- Cold heavy whipping cream (1¼ cups / 300ml, 35% fat): Whipped to soft peaks for a light, airy mousse texture.
You’ll find the full ingredient list, instructions, and print option in the recipe card below.
How to Make Decadent Chocolate Mousse Cake Recipe
Step 1: Prepare the Cake Base
Start by preheating your oven to 350°F and lining an 8×8-inch metal baking pan with parchment paper, letting the edges hang over the sides for easy removal later. Then, sift together the flour, cocoa powder, baking powder, and baking soda into a mixing bowl. Adding sugar and salt, whisk everything evenly to ensure your dry ingredients are perfectly combined. Creating a well in the center, gently add oil, beaten egg, sour cream, warm milk, and vanilla extract before whisking everything into a smooth, lump-free batter that’ll give you that tender cake texture we all love.
Step 2: Bake and Cool the Cake
Pour the batter into your prepared pan, spreading it out evenly with a spatula for a perfectly flat top. Bake for 20 to 25 minutes, testing with a skewer to ensure it comes out clean in the center. Once baked, set your cake on a wire rack to cool completely—this step is crucial for layering the mousse smoothly. If needed, trim the top to get a level surface but you might be delighted to find it bakes nice and flat naturally.
Step 3: Craft the Silky Chocolate Mousse
Chop your dark and milk chocolates finely and place them in a heatproof bowl. Warm the milk in a microwave or saucepan until it’s steaming hot to prepare the rich custard base. Whisk together egg yolks and sugar in a saucepan, then slowly blend in the hot milk. Cook gently over medium-low heat, stirring constantly, until the mixture thickens enough to coat the back of a spoon. Immediately pour this custard over your chopped chocolate, add a pinch of salt, and stir until the chocolate melts into a smooth, glossy mixture. Let this cool for about 10-15 minutes to reach the perfect temperature for folding.
Step 4: Whip and Fold the Cream
Whip the cold heavy cream until it forms medium peaks—when you lift your mixer, the cream should curl slightly without being too stiff. Gently fold one-third of the whipped cream into the chocolate custard to lighten it, then carefully fold in the remaining cream in two batches. This folding technique preserves the airy texture that makes this Decadent Chocolate Mousse Cake Recipe so irresistible. Spread the mousse evenly over your cooled cake in the pan, smoothing the top with a spatula.
Step 5: Chill and Finish
Place your assembled cake in the refrigerator for at least four hours to allow the mousse to set perfectly. When you’re ready to serve, loosen the sides from the pan using a spatula, and lift the cake out by the parchment overhang. For a final touch, dust the top with cocoa powder for that elegant, chocolatey finish.
How to Serve Decadent Chocolate Mousse Cake Recipe

Garnishes
This cake shines on its own, but adding fresh berries or a sprig of mint can brighten up the rich chocolate flavors and add a pop of color. Whipped cream or a drizzle of raspberry coulis works beautifully too, giving a balance of sweetness and tang that pairs wonderfully with the mousse.
Side Dishes
Keep sides simple to let the star shine—consider a light espresso or chilled dessert wine to complement the chocolaty richness. Vanilla ice cream or a scoop of berry sorbet provides a cool contrast that’s simply divine beside each slice.
Creative Ways to Present
For gatherings, try slicing this cake into elegant squares or small rounds using a cookie cutter to serve as bite-sized treats. You can even top each piece with a curl of chocolate or a sprinkle of chopped nuts to amp up the texture and presentation for your guests.
Make Ahead and Storage
Storing Leftovers
Wrap leftover cake tightly in plastic wrap or keep it in an airtight container in the fridge. It will stay fresh for up to 3 days with the mousse retaining its creamy texture beautifully.
Freezing
This Decadent Chocolate Mousse Cake Recipe freezes well. Wrap it securely in plastic wrap and aluminum foil before freezing. Thaw overnight in the fridge before serving to keep the mousse silky and the cake moist.
Reheating
Since this cake is best served chilled, reheating is not recommended. If you prefer, enjoy leftovers straight from the fridge or let it sit at room temperature for 15-20 minutes for the mousse to soften slightly before serving.
FAQs
Can I use different types of chocolate in this recipe?
Absolutely! While bittersweet and milk chocolate create a beautiful balance here, you can experiment with semisweet, dark, or even white chocolate to tailor the cake’s flavor to your liking.
Is it necessary to use sour cream in the cake batter?
Sour cream adds moisture and a slight tang that enhances the cake’s flavor and keeps it tender, but you can substitute with Greek yogurt or buttermilk if needed.
How do I know when the mousse is properly whipped and folded?
The cream should be whipped to medium peaks, meaning it holds its shape but is still soft and smooth. Folding carefully ensures you don’t lose the air you’ve whipped in, resulting in a light and fluffy mousse texture.
Can I make this cake gluten-free?
You can substitute the all-purpose flour with a gluten-free baking blend, but make sure it contains xanthan gum or a similar binder for the best results.
What’s the best way to slice this mousse cake?
Use a sharp knife dipped in hot water and wiped dry between slices. This technique helps keep clean cuts through the mousse without dragging or squishing the cake.
Final Thoughts
Trust me when I say this Decadent Chocolate Mousse Cake Recipe is a total game-changer for any chocolate lover. It’s elegant, impressive, and yet surprisingly approachable for bakers of any level. Give it a try and get ready to have friends and family coming back for seconds — it’s one of those desserts that just makes you feel special with every forkful.
PrintDecadent Chocolate Mousse Cake Recipe
This rich and decadent Chocolate Mousse Cake combines a moist cocoa-flavored cake base with a smooth, airy chocolate mousse topping. Baked to perfection and chilled for hours, this dessert offers a perfect balance of bitterness from bittersweet chocolate and sweetness from milk chocolate, making it ideal for chocolate lovers seeking an elegant yet approachable treat.
- Prep Time: 15 minutes
- Cook Time: 25 minutes
- Total Time: 4 hours 40 minutes
- Yield: 9 servings
- Category: Dessert
- Method: Baking
- Cuisine: French-inspired
Ingredients
Cake
- ⅔ cup (95g) all-purpose flour
- ⅓ cup (28g) cocoa powder
- ½ tsp baking powder
- ¼ tsp baking soda
- ¾ cup (150g) granulated sugar
- ¼ tsp salt
- ¼ cup (60ml) sunflower oil
- 1 large egg, lightly beaten
- ¼ cup (60ml) full fat sour cream
- ⅓ cup (80ml) warm milk
- 1 tsp (5ml) pure vanilla extract
Mousse
- 5 oz (142g) bittersweet chocolate (70% cocoa), finely chopped
- 2 oz (56g) milk chocolate, finely chopped
- ⅔ cup (150ml) whole milk
- 3 large egg yolks
- ⅓ cup (65g) granulated sugar
- pinch of salt
- 1 ¼ cups (300ml) cold heavy 35% whipping cream
Instructions
- Prepare the oven and pan: Preheat the oven to 350°F (175°C). Line an 8×8-inch metal baking pan with parchment paper, leaving a 2-inch overhang on each side for easy cake removal after baking.
- Mix dry cake ingredients: Sift together the all-purpose flour, cocoa powder, baking powder, and baking soda into a medium bowl. Add the granulated sugar and salt, then whisk until well combined and evenly blended.
- Combine wet and dry ingredients: Make a well in the center of the dry ingredients. Add sunflower oil, lightly beaten egg, full-fat sour cream, warm milk, and vanilla extract to the well. Slowly whisk everything together until the batter is smooth and homogenous.
- Bake the cake: Spread the batter evenly into the prepared pan using a small offset spatula. Bake for 20-25 minutes or until a toothpick inserted in the center comes out clean. Transfer the cake to a wire rack and let it cool completely in the pan. Trim the top if necessary to level the surface, though typically it bakes flat.
- Prepare the chocolate: Place the finely chopped bittersweet and milk chocolates in a medium heatproof bowl and set aside.
- Heat the milk: Warm the whole milk in a microwave-safe jug until steaming (about 10 minutes in the microwave) or heat gently in a covered saucepan, ensuring minimal evaporation.
- Make the custard base: In a 1-quart stainless steel saucepan, whisk the egg yolks and granulated sugar until smooth. Gradually pour in the warm milk while whisking continuously. Place the saucepan on medium-low heat and stir constantly with a rubber spatula or wooden spoon for 5-7 minutes until the mixture thickens and coats the back of a spoon like thick cream.
- Combine custard and chocolate: Immediately pour the hot custard over the chopped chocolate. Add a pinch of salt and stir until completely melted and smooth. If the mixture cools too much and the chocolate does not fully melt, gently warm it for 20-30 seconds on low power in the microwave. Let the chocolate custard cool for 10-15 minutes until no longer hot.
- Whip the cream: Using an electric hand mixer, whip the cold heavy cream in a medium bowl to medium peaks (the cream slightly curls when you lift the beaters). Take one-third of the whipped cream and fold it into the chocolate custard to lighten the mixture. Then gently fold in the remaining cream in two additions, being careful to maintain the airiness.
- Assemble and chill: Pour the chocolate mousse over the cooled cake still in the pan. Spread evenly with a small offset spatula. Refrigerate for at least 4 hours to allow the mousse to set.
- Serve: To serve, use a small offset spatula to loosen the cake edges from the pan where there is no parchment paper. Lift the cake out using the parchment overhang. Dust the top with cocoa powder before slicing and serving.
Notes
- Use good quality bittersweet and milk chocolate for the best flavor and texture.
- Be sure to whip the cream to medium peaks, not stiff peaks, to achieve smooth mousse texture.
- Folding technique is crucial for maintaining the mousse’s light and airy consistency; fold gently to avoid deflating the whipped cream.
- Allow the mousse cake to chill for at least 4 hours or overnight for best flavor development and setting.
- You can line the pan with parchment paper with overhang to make cake removal easier and prevent damage.

