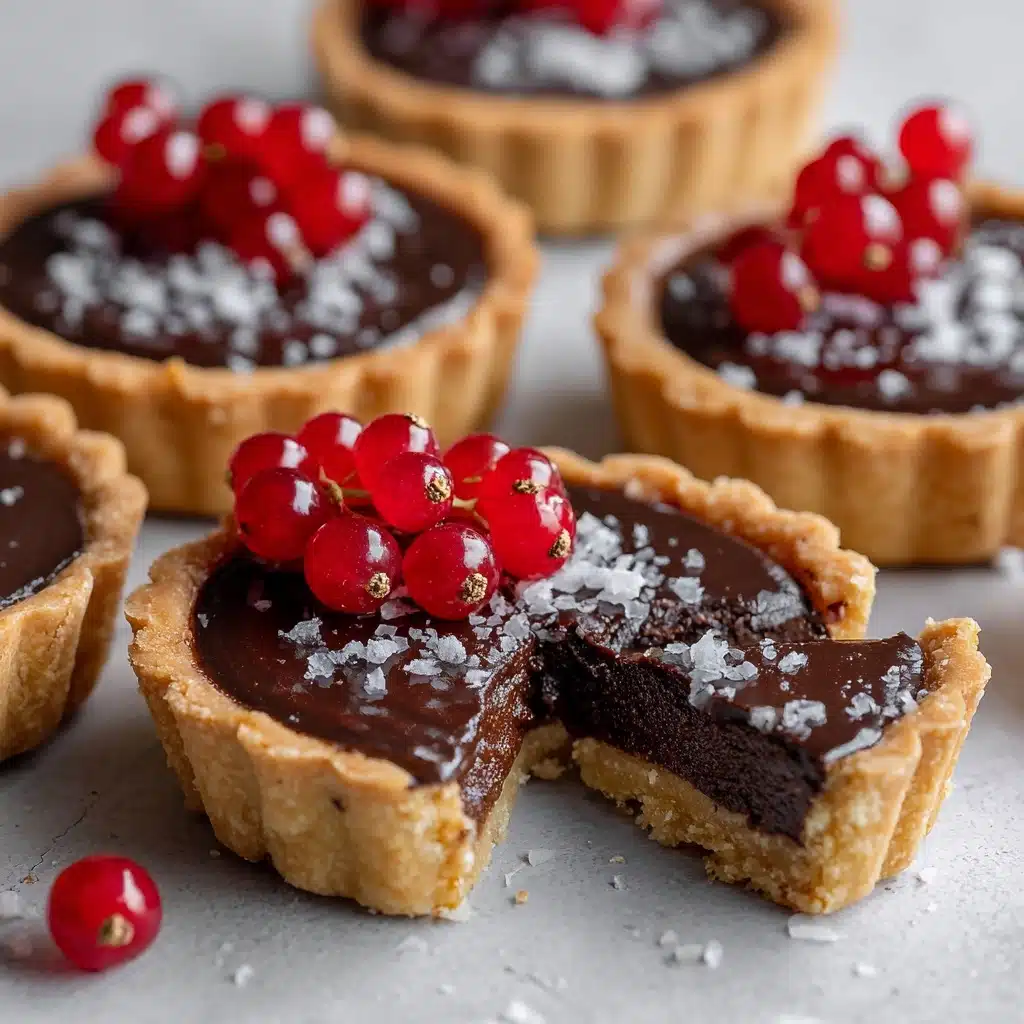
If you’re looking to impress your friends (or simply treat yourself!), this Chocolate Mini Tarts Recipe is the kind of elegant but easy dessert that will have everyone swooning. A buttery, golden shortbread crust cradles a silky, decadent chocolate ganache, finished with your choice of stylish garnishes. Whether you love a pop of red currants or dustings of cocoa powder, these bite-sized tarts look stunning on a platter but truly shine in that first divine bite. They’re perfect for gatherings, gifting, or just for your own little luxuries — trust me, you’ll be asked for this recipe again and again!
Ingredients You’ll Need
Let’s talk about how a few simple but quality ingredients make all the difference in this Chocolate Mini Tarts Recipe. Each element — from butter to velvety chocolate — plays a key role in creating that unforgettable texture and rich flavor. Here’s what you’ll need and why it matters:
- Salted Butter: Adds a little contrast to balance sweet flavors and ensures a melt-in-the-mouth crust.
- Granulated Sugar: Sweetens the shortcrust base and helps achieve that light, tender structure.
- Egg Yolks: Provide richness and bind the dough for a perfectly crumbly pastry.
- Plain Flour (All-Purpose): The essential base for your sablée shortcrust, giving each tartlet its delicate bite.
- Dark Chocolate (70% bittersweet): The star of the ganache, offering deep, complex chocolate flavor.
- Double Cream (Heavy Cream): Creates the lusciously smooth texture of the ganache filling.
- Salted Butter (for ganache): Adds shine, silkiness, and a touch of salt to amplify chocolate notes.
- Golden Syrup: Gives extra gloss and softness to the ganache, so each bite melts beautifully.
- Decoration (Cocoa powder, Chocolate Shavings, Red Currants – optional): A finishing touch that brings both color and flair — use your favorites or mix and match!
How to Make Chocolate Mini Tarts Recipe
Step 1: Make the Sablée Shortcrust Dough
Start by creaming the butter and sugar together until the mixture is pale and fluffy. Using room temperature ingredients will help here — it should come together easily in a stand mixer or with a handheld one. Add in the egg yolks, mixing until smooth, then gently blend in the flour. Don’t overwork the dough; you just want everything to be combined, so your tarts stay tender and crumbly. If your dough feels sticky, a quick wrap in plastic and a 15-minute rest in the fridge will make it easier to handle.
Step 2: Line and Chill the Tart Tins
Take pieces of the dough and press them into the mini tart tins, ensuring you get an even layer up the sides. Use your fingers or the bottom of a glass for a uniform crust. Dock (poke) the base with a fork to prevent puffing, and chill your lined tins in the fridge for 30 minutes (or the freezer for 15). This step ensures the tarts hold their shape and bake up crisp and perfect.
Step 3: Bake the Tart Shells
Preheat your oven to 160°C (320°F). Bake the tart bases for 30-35 minutes, giving the pan a turn halfway through. They should emerge golden and cooked through, not just around the edges. Remove and let them cool completely on a wire rack, which keeps them crisp and ready for their silky filling.
Step 4: Make the Chocolate Ganache
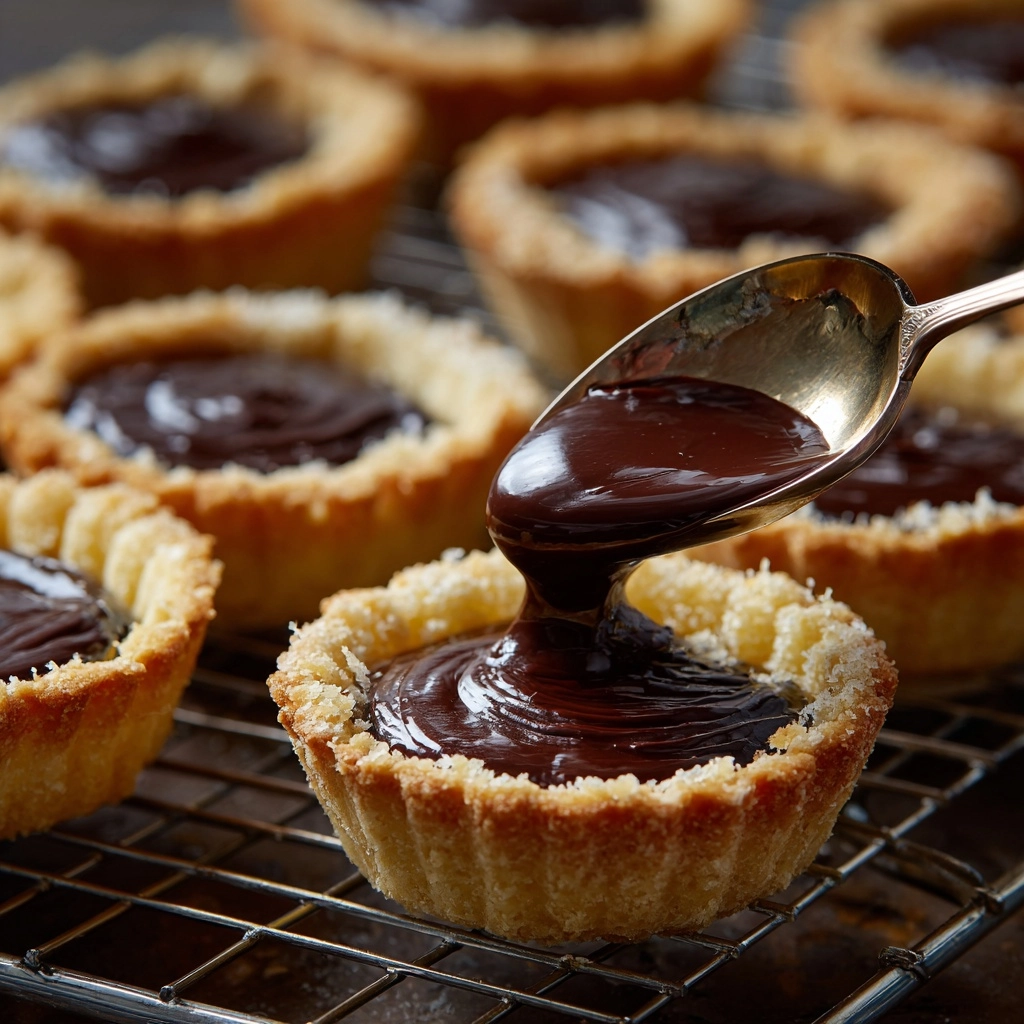
Finely chop your chocolate so it melts quickly and evenly. Gently heat the cream until it’s steaming with little bubbles at the edges (don’t let it boil!). Pour the hot cream over the chocolate, add the butter and golden syrup, and let it sit briefly to melt. Now, whisk it all together gently — you’ll see a glossy, luxurious ganache take shape. It should be smooth, rich, and absolutely irresistible.
Step 5: Fill and Set the Tarts
Spoon or pipe the ganache into each cooled tart shell, filling them almost to the top. Smooth the surface as needed — no need to be fussy, they’ll look gorgeous. Chill the filled tarts for at least an hour until the ganache is set to a delicate, truffle-like consistency. Let them sit at room temperature for 30 minutes before adding any toppings, which will soften the filling for the best possible bite.
Step 6: Decorate and Enjoy
When you’re ready to serve, release the tarts from the tins and add your favorite garnishes. A light dusting of cocoa powder, some chocolate curls, or a few red currants instantly makes these Chocolate Mini Tarts Recipe worthy of a bakery window. Snap a photo if you wish — but don’t wait too long to dig in!
How to Serve Chocolate Mini Tarts Recipe
Garnishes
Garnishing is where you can get playful! I love dusting the tops with high-quality cocoa powder for that classic look, or adding delicate chocolate shavings for an extra touch of luxury. Red currants provide a tart pop of color and a lovely contrast to the deep chocolate flavor. Even a sprinkle of edible gold leaf can make these mini tarts fit for the fanciest celebration.
Side Dishes
Since this Chocolate Mini Tarts Recipe is rich and decadent, it shines alongside light accompaniments. Fresh berries or a simple fruit salad work beautifully, balancing the deep chocolate with refreshing juiciness. For something a bit more indulgent, a small scoop of vanilla gelato or whipped cream makes every bite even more dreamy.
Creative Ways to Present
Arrange the tarts on a tiered cake stand for a high-tea effect, or group them among fresh flowers and berries for that Pinterest-worthy dessert table. As party favors, pop each tart into a mini box tied with a ribbon — your guests will get the sweetest send-off! Mini tarts are also perfect for building dessert boards, paired with truffles, strawberries, or macarons.
Make Ahead and Storage
Storing Leftovers
While these tarts are at their freshest the day they’re made, you can stash leftovers in an airtight container in the fridge for up to four days. The crust may soften just a touch, but the flavors remain as bold and enticing as ever. Bring them to room temperature before serving so the ganache regains its silky texture.
Freezing
As tempting as it is to batch-cook and freeze everything, this Chocolate Mini Tarts Recipe doesn’t freeze well once assembled (the filling can get a bit grainy). However, you can prepare the unbaked pastry shells and freeze them for later. Bake straight from the freezer, adding a few extra minutes to the bake time, and fill freshly with ganache for best results.
Reheating
There’s no need to reheat these mini tarts, but if you’d like the centers to be extra dreamy, set them out on the counter for 20 to 30 minutes before serving. The ganache will relax, and the crust will taste just as buttery as when first baked. If you prefer a warmer bite, a very brief stint in a low oven (no more than a minute or two) can do the trick, but watch closely!
FAQs
Can I use milk chocolate instead of dark chocolate?
Absolutely! If you prefer a sweeter, creamier ganache, milk chocolate can be swapped in. Just be aware the tart will be milder in flavor and quite a bit sweeter, so you may want to adjust the sugar in the crust or add a pinch more salt to balance things out.
What if I don’t have mini tart tins?
No worries! Muffin tins with parchment or silicone liners work in a pinch. The crust won’t look quite as dainty, but you’ll still get those adorable single-servings. You can also use store-bought tartlet shells for convenience and simply fill with your homemade ganache.
Can I make the pastry dough in advance?
Yes, making the dough ahead is a great way to streamline prep. Wrap it tightly in plastic wrap and refrigerate for up to 48 hours. When you’re ready, simply press into the tins, chill, and bake as directed. The dough also freezes well for up to a month if you want to get extra ahead!
Why did my ganache split or look oily?
Ganache can split if the cream is overheated or if the chocolate isn’t chopped finely enough. Always heat the cream gently and pour it over finely chopped chocolate. Stir slowly and patiently until creamy and smooth. If things go awry, a splash of warm milk and a good whisking can sometimes rescue “broken” ganache.
How can I make this Chocolate Mini Tarts Recipe gluten-free?
You can easily swap the plain flour for a high-quality 1-to-1 gluten-free baking blend. The dough texture will be delicate, so handle it gently, but you’ll still get that irresistible crumbly shell and rich ganache. This recipe is perfect for adapting to different dietary needs!
Final Thoughts
I can’t wait for you to try this Chocolate Mini Tarts Recipe — it’s genuinely one of those treats that brings big smiles and turns any day into something special. Whether you’re baking for a party, a loved one, or your own delicious moment of self-care, these tiny tarts are proof that a little chocolate goes a very long way. Give them a whirl, and let your inner pastry chef shine!
PrintChocolate Mini Tarts Recipe
Indulge in these decadent Chocolate Mini Tarts that feature a buttery shortbread tart base filled with rich chocolate ganache. Perfect for any occasion!
- Prep Time: 25 minutes
- Cook Time: 30 minutes
- Total Time: 1 hour 25 minutes
- Yield: 9 mini tarts
- Category: Dessert
- Method: Baking
- Cuisine: French
- Diet: Vegetarian
Ingredients
Sablée Shortcrust Dough:
- 130 g salted butter, room temperature
- 65 g granulated sugar
- 2 large egg yolks
- 220 g plain flour (all-purpose)
Chocolate Ganache:
- 120 g dark chocolate (70%), chopped
- 120 ml double cream (heavy cream)
- 30 g salted butter
- 1 tablespoon golden syrup
Decoration:
- Cocoa powder, chocolate shavings, or red currants (optional)
Instructions
- Make the Sablée Shortcrust Dough – Cream butter and sugar, add egg yolks, mix in flour to form a dough, press into tart pan, dock the base, refrigerate, and bake.
- Make the Chocolate Ganache – Heat cream, pour over chocolate, add butter and syrup, whisk until smooth.
- Assemble the Tarts – Fill tart shells with ganache, refrigerate until set, then decorate before serving.
Notes
- Step-by-Step Photos: Detailed visual guide available on the blog post.
- Yield: Recipe makes 9-10 mini tarts based on 5cm/2-in diameter shallow tart tins.
- Storage: Best consumed fresh or refrigerated in an airtight container for up to 4 days.
- Freezing: Dough can be frozen before baking; do not freeze assembled tarts.
- Tips: Follow tips provided for best results in dough and ganache preparation.
Nutrition
- Serving Size: 1 mini tart
- Calories: 310 kcal
- Sugar: 13 g
- Sodium: 123 mg
- Fat: 26 g
- Saturated Fat: 16 g
- Unsaturated Fat: 8 g
- Trans Fat: 1 g
- Carbohydrates: 34 g
- Fiber: 2 g
- Protein: 5 g
- Cholesterol: 97 mg





https://shorturl.fm/MYqL8
https://shorturl.fm/5nCj0
https://shorturl.fm/So3p7
https://shorturl.fm/n8kNx
https://shorturl.fm/2I04N
https://shorturl.fm/dlyzK
https://shorturl.fm/y0Zjy
https://shorturl.fm/JeHnf
https://shorturl.fm/CsWxr
https://shorturl.fm/N0CdV
https://shorturl.fm/FaUaI
https://shorturl.fm/8DtEX
https://shorturl.fm/bB4sG
https://shorturl.fm/wKhby
https://shorturl.fm/H3ckt
https://shorturl.fm/KWelQ
https://shorturl.fm/8T3Pk
https://shorturl.fm/9j6tm
https://shorturl.fm/4EEzQ
https://shorturl.fm/PeAdJ
https://shorturl.fm/Z6jJh
https://shorturl.fm/Uk1zj
https://shorturl.fm/SLmvt
https://shorturl.fm/NoJoQ
https://shorturl.fm/CND5C
https://shorturl.fm/ZwFys