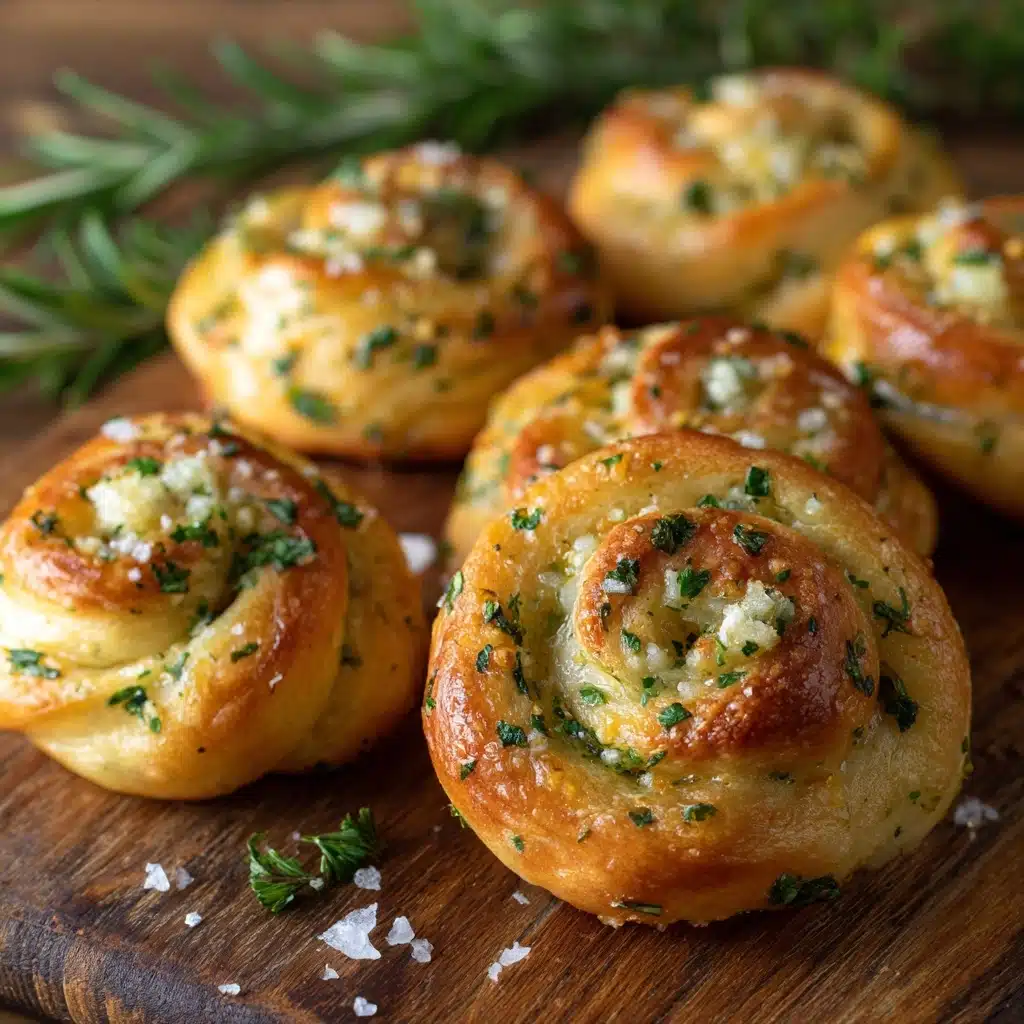
Garlic Knots are pure carb happiness—pillowy-soft, golden little delights tied by hand, brushed with fragrant garlic butter, and impossible not to reach for seconds. Whether you’re just learning your way around baking or you’re a seasoned bread-lover, this recipe will win your crowd every time. Served warm, dipped in marinara, they transform any gathering into an instant celebration and make your kitchen smell absolutely dreamy. There’s something truly satisfying about twirling each knot, then watching friends and family light up with their first bite. These are the garlic knots you’ll crave again and again.
Ingredients You’ll Need

Ingredients You’ll Need
With just a handful of humble staples and some fresh aromatics, these Garlic Knots come to life. Each ingredient is vital, adding its own character, from the creamy tang of yogurt to the vibrance of parsley. Here’s how it all comes together:
- Self-rising flour: Gives the knots their legendary fluffiness without the fuss of yeast or leavening agents—perfect for speedy prep.
- Greek or Whole Milk Yogurt: The secret to tender, slightly tangy knots; use plain, full-fat yogurt for richness that pairs beautifully with the garlic butter.
- Unsalted butter: For a lush, creamy garlic coating that soaks into every twist of dough—melted for easy brushing.
- Garlic cloves: Fresh and finely minced, they infuse the butter with bold, mouthwatering aroma (bottled just won’t rival the magic here).
- Fresh parsley: Brightens every bite with a pop of green and gentle herbal flavor; don’t skip it!
- Salt: Essential for both the dough and the garlicky glaze—brings all the flavors into sharp, delicious focus.
- Black pepper: Adds a subtle warmth in the garlicky coating and rounds out the flavor profile.
- Olive oil: Brushed on before baking, it helps the knots brown beautifully and adds a hint of fruitiness.
- Extra flour for dusting: For a non-sticky, workable surface as you shape those adorable knots.
How to Make Garlic Knots
Step 1: Make the Dough
Start by combining the self-rising flour and yogurt in a large bowl or directly on a clean cutting board. Don’t worry if the mixture looks crumbly or dry—they’ll come together as you knead. Mix with your hands until you have a shaggy, somewhat sticky dough. The yogurt hydrates the flour, activates its leavening power, and brings a gentle tang to the bread.
Step 2: Knead Until Smooth
Turn your dough onto a lightly floured surface and knead for about 8 minutes. It should become smooth, elastic, and just slightly tacky. Dust with additional flour if things get sticky, but avoid adding too much—overflouring leads to dense knots. You’re looking for a dough that springs back gently when poked.
Step 3: Shape and Slice
Divide the dough into four equal pieces. Flatten each chunk into a rectangle with your hands or a rolling pin. Cut each rectangle into strips, about 1 inch by 5 inches. Then, slice those long strips in half, so you have two shorter strips (about 1 by 2.5 inches). All that’s left to do now: tie each piece into a cozy little knot.
Step 4: Tie and Prep for Baking
Grab each dough strip by the ends, tie it in an overhand knot (like tying your shoelace), and place the knots onto your prepared baking sheet lined with parchment or a silicone mat. Brush the tops with a bit of olive oil for golden color and subtle flavor, then let them rest for 10–15 minutes. This quick proof gives your Garlic Knots the best chewy texture and gentle rise.
Step 5: Bake Until Golden
Preheat your oven to 400°F. Uncover and bake your knots for 12–15 minutes, rotating the pans if needed, until they’re puffed and deep golden brown. The aroma will alert you when they’re nearly ready—try to resist peeking too often, but do check for color in the final minutes.
Step 6: Make the Garlic Butter
While the knots bake, melt the unsalted butter in a small saucepan over medium-low heat. Add the minced garlic and let it gently cook for 1–2 minutes, just until fragrant but not browned. Stir in the parsley, salt, and pepper, then take it off the heat. This warm, vibrant mixture will coat each knot in glossy, garlicky goodness.
Step 7: Brush and Serve
Once your knots come out of the oven, let them cool for about 5 minutes so they’re easier to handle. While they’re still warm, generously brush each one with the garlic butter mixture, making sure to get into every twist and crevice. Serve them up straight away with a bowl of marinara for dipping—and savor the moment of sharing truly irresistible Garlic Knots!
How to Serve Garlic Knots
Garnishes
Elevate your Garlic Knots by finishing them with a sprinkling of flaky sea salt, a bit of grated Parmesan, or an extra dusting of freshly chopped parsley. For a touch of heat, a light sprinkle of crushed red pepper flakes is fantastic. Garnishing not only adds flavor and pop but also invites your friends to reach in and enjoy.
Side Dishes
Serve Garlic Knots alongside a big bowl of your favorite marinara or pizza sauce for dipping—it’s honestly non-negotiable! Pair with classic Caesar salad, a hearty vegetable soup, or spaghetti night for that ultimate Italian-American comfort meal. They also shine as part of a savory appetizer platter with olives, cheeses, and roasted veggies.
Creative Ways to Present
Garlic Knots look charming spilled out of a lined basket for rustic appeal, but you can also stack them in a bread tower or arrange them around a dipping bowl for a stunning centerpiece. For parties, thread them onto wooden skewers or serve on a platter with a trio of sauces (think marinara, ranch, and pesto). Kids especially love when you tuck in mini knots to lunchboxes as a fun, flavorful surprise.
Make Ahead and Storage
Storing Leftovers
If you happen to have leftover Garlic Knots (it’s rare!), store them in an airtight container at room temperature for up to 2 days. They maintain their tender crumb and brilliant garlicky flavor, but you’ll want to refresh them before serving again for the full fresh-baked effect.
Freezing
Garlic Knots freeze exceptionally well! Let them cool completely after baking and brushing, then place in a single layer in a zip-top bag. Freeze for up to 2 months. Reheat straight from the freezer or thaw at room temp for an hour—either way, the flavor and texture hold up beautifully.
Reheating
To bring Garlic Knots back to their just-baked glory, pop them in a preheated 350°F oven for 7–10 minutes. Alternatively, a quick stint in the air fryer restores that irresistible golden crust. If you’re in a rush, the microwave works for 10–15 seconds, but oven reheating keeps them fluffy and crisp.
FAQs
Why does this recipe use yogurt instead of yeast?
Using yogurt skips the need for yeast and lengthy rising times, yet still delivers wonderfully tangy, pillowy knots. The acidity and moisture in yogurt activate the leavening in self-rising flour—no proofing, waiting, or fussing with yeast required!
Can I swap in all-purpose flour?
Yes, but you’ll need to add 1 1/2 teaspoons baking powder and 1/2 teaspoon salt per each cup of all-purpose flour to mimic self-rising. Otherwise, the recipe works best as written for optimal rise and softness in the Garlic Knots.
Are Garlic Knots vegan-friendly?
As written, this recipe features yogurt and butter, both of which contain dairy. To make them vegan, use your favorite plant-based Greek-style yogurt and a good quality vegan butter. The results are still totally craveable!
Can I make these knots in advance?
Absolutely! Prepare the dough and shape the knots up to a few hours ahead, place them on your lined tray, and refrigerate, covered, until ready to bake. Brush with oil, then pop in the oven as directed—fresh Garlic Knots right when you want them.
Why aren’t my knots browning nicely?
If your Garlic Knots aren’t turning golden, try moving your oven rack up one level, and make sure you’re brushing lightly with olive oil before baking. Ovens vary, so adding an extra 1–2 minutes of bake time often solves the issue without drying them out.
Final Thoughts
Sharing a big batch of Garlic Knots is one of life’s tastiest joys—they’re easy, endlessly comforting, and destined to disappear fast! Whether you serve them with dinner, as the star snack, or just because, you’ll want to revisit this recipe again and again. Give it a try, and let the warm, buttery aroma draw everyone to your kitchen!
PrintGarlic Knots Recipe
Impress your guests with these delicious garlic knots, perfect as an appetizer. Serve with marinara sauce for a delightful treat!
- Prep Time: 15 minutes
- Cook Time: 20 minutes
- Total Time: 35 minutes
- Yield: 12 knots
- Category: Appetizer
- Method: Baking
- Cuisine: Italian
- Diet: Vegetarian
Ingredients
Dough Ingredients:
- 2 cups self-rising flour, plus more for dusting
- 1 cup Stonyfield Organic Whole Milk Greek Plain Yogurt or Stonyfield Organic Traditional Whole Milk Plain Yogurt
Garlic-Butter Coating Ingredients:
- 5 Tbsp unsalted butter
- 4 cloves garlic, minced
- 1/4 cup parsley, minced
- 1 tsp salt
- 1/2 tsp pepper
Instructions
- Knots: Combine flour and yogurt until a shaggy dough forms. Knead until smooth. Divide into 4 pieces, flatten into rectangles, and slice into strips. Form knots.
- Brush with olive oil and let rise: Brush knots with oil and let rise. Preheat oven to 400°F.
- Bake: Bake knots for 12-15 minutes until browned.
- Garlic Glaze: Melt butter, cook garlic, add salt and parsley. Brush knots with garlic-butter mixture.
Nutrition
- Serving Size: 1 knot
- Calories: 145
- Sugar: 1g
- Sodium: 320mg
- Fat: 6g
- Saturated Fat: 4g
- Unsaturated Fat: 2g
- Trans Fat: 0g
- Carbohydrates: 19g
- Fiber: 1g
- Protein: 4g
- Cholesterol: 15mg


